Showing posts with label arts and crafts. Show all posts

Flower number 18: inspiration in a pretty (fun) paper alphabet

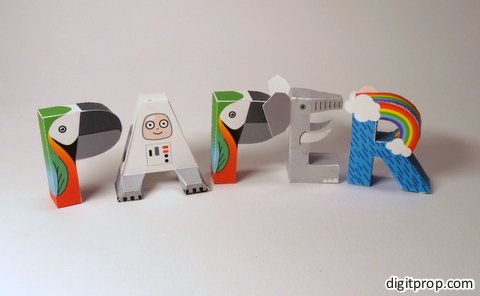
Paper brought to you by Digitprop
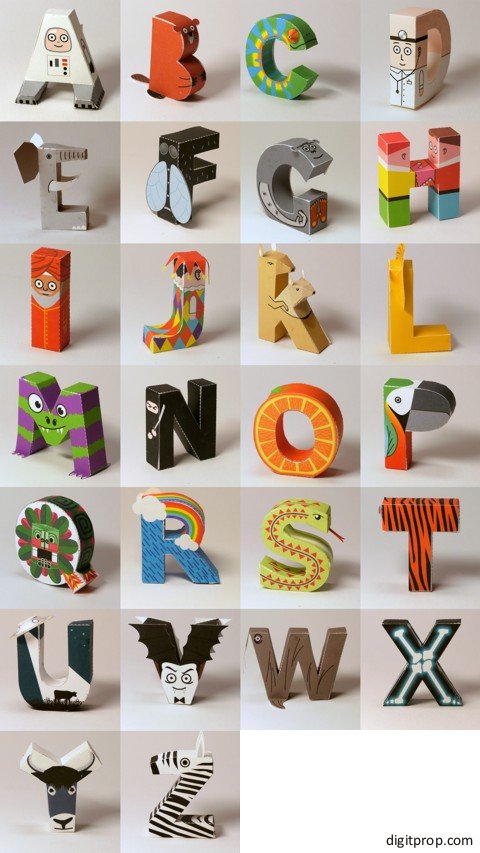
Digitprop has created, and shared, a beautiful paper alphabet. Wasn't that nice? Just print out and create! I can already think of so many things to do with these little guys... how 'bout you?

Photo by Digitprop. This is one amazing resource for fun. 
Everything you need is in their zipped up file, free for downloading, printing, and creating! Great for preschoolers, yes, but can't you see these used as a fun decoration in a child's room? I'm going to print some out and place in my classroom -- maybe "R E A D" or "D R E A M" or "W R I T E" or "I M A G I N E" . . . I can't wait to get started!

Download the letters individually here.
Download the complete set here.

Please share how you used these awesome letters by commenting, or submitting photos to the Flowers for Ferdinand Flickr Pool. I would love to see how your were inspired, and what you created ...or how you played games with these guys.

Big thanks to Digitdrop for their awesomeness.


Flower number 17: book making with students

Finding an authentic purpose for your students to practice the skills they've learned in your class is big. In a language arts block, one of most challenging tasks is to get the whole class set on writing with joy and excitement.

But when you've got it, there's nothing like it.

Forget writing skills for a moment-- seeing the entire group focused and writing their passionate little hearts out is what success feels like when you're a teacher.

One way to present an authentic purpose to your students is to have them write a book. There are so many steps in this project, and I've done it a few different ways, but my inspiration has been reignited through the artistry that I have found in so many online communities. I'd like to share them with you here, in hopes that you might want to explore this art from with your class, your children-- or yourself.


My favorite page for making books with children is just that:
Makingbooks.com from Susan Kapuscinski Gaylord

Flower number 16: seababy besties

Amigurumi is so cute, you could crochet a warthog with a hyena stuck to its butt and it would still be irresistible. Upon teaching myself to crochet many years ago, I instantly attached myself to the patterns created by Tamie Oldridge (previously known as Tamie Snow) at Roxycraft. 

A set of Tamie Oldridge's amazing patterns from her  pattern shop at Roxycraft
She was, and is, making darling creatures --tiny animals and make believe friends. Her patterns totally helped me perfect my crocheting ability, and in no time, this self-taught girl was crocheting up a storm.


After crocheting one of her charming little fish, I was hooked. (Pun intended) I continued through the years and more recently, I made these three sea creatures for the new baby of two of my dear friends. I used  Roxycraft's pattern as a basis for the little green fish, but improvised a lot for the baby puffer and octopus.


For the octopus, I crocheted a sphere and sewed a piece of red fabric into it. I stuffed it slightly, so that there would be a cushioned feeling, and she could put her little hand into it, much like a puppet. This would make it more fun to play with, as the 8 long legs twirled around quite well. As for the legs themselves, they were easy-- I just had to make 8 of them. 3 rows each, the sides were stitched together, and the seam closed shut with a light pink strip of yarn. Each leg was completed with one teeny tiny tentacle.

The baby puffer fish was improvised by first crocheting a box and then decreasing until it closed up. This little one was given a couple of little bells so that shaking it is so much fun. The tail got a pouf and she definitely had to have big, puckered fish-lips.
Throughout the years of creating little amigurumi friends, I always embroidered their faces on. I've seen some terrific ones made from felt, or even plastic materials too. In any case, these three friends were some of my favorite creations, and they were so fun to give to a beautiful newborn baby.

Crocheting can be so relaxing and rewarding --especially with an amigurumi project. They really just get cuter and cuter with every stitch. You know, maybe I'll give that ol' warthog a try.

How 'bout some inspiration:
Roxycraft.com
Amigurumi Kingdom
GourmetAmigurumi


Flower number 15: don't press my buttons!

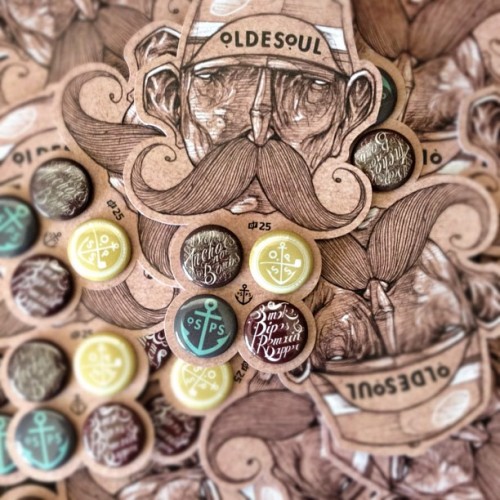
"Don't press my buttons!" Yeah, yeah, yeah... but I've come across some ideas on the web and around town that are going to entice people to do just that. This post isn't about anything I've done, but more like what I might do some day. Or, what you could do, if you have buttons. So, upon Instagramming today, I "liked" this photo, below. Isn't it great? I thought so too.

Olde Soul Print Shop Button Packs from their blog

It's part of the collection from Olde Soul Print Shop. Usually you can take a gander at real good lookin' drawings and logo design in their thread, but today they featured this creative way for displaying their fantastic branding on buttons. I loved it so much-- it got me thinking. 

Button Bat from The Really Rottens is cute as a button. ;)

"This reminds me of something" but what was it? Well, it was the awesome little handmade, origami, shade-wearing, bat-- courtesy of Austin's coolest surf band, The Really Rottens. This was easy enough, and I imagine, cheap! The band left these little guys around the tables at the venue, free for the taking. They definitely got picked up and played with by adoring fans, and for sure helped spread the word. The rockin' word, that is.

Abby Larson's Seating Cards from Style Me Pretty, featured in Today's Bride

So then I got to browsing, and brainstorming. These little buttons are so easy to make, so cheap, and so much more fun than a business card, why not use them whenever possible? I loved this idea for seating cards at a wedding. I would have never thought of that.

So those of you who own button machines-- I say, get creative! These ideas for branding, marketing, or partying, are definitely a great way to share your love.


Flower number 13: an armoire story

This is the story of an armoire that became so much more.

Walking through the Mountain View, California Ikea store, a poor student teacher hunted for the perfect solution for holding a television, dvd player, and a small dvd collection. It had to be cheap, tidy, cute, and above all else, petite-- for, this dream furniture fixture had to fit in a tiny studio apartment.

At last, there it was, in the children's furniture area: a baby armoire. She took it home, built it, and disposed of the clothes-hanging-pole which she had to admit would be awfully cute for baby clothes. But not this time around. The armoire felt very happy to be filled with the well loved films and boxes of letters and unfinished crafts.

The student teacher soon became a real, third grade teacher, and the sweet baby armoire continued to serve its purpose, nestled quietly in that tiny studio apartment, until one day, an envelope arrived. The teacher realized within this envelope was her new apartment lease. Her rent was to be raised by an amount exceeding one hundred dollars. The armoire became nervous. Would she have to move?

Alas, the solution was to relocate to another state, where rent was much cheaper than that of the beautiful California Coast. The quaint baby armoire knew it was for the best when the teacher put it in her parents' garage. She went away to become a fourth grade teacher."I'll be back for you some day" she said.


That day came, and for another year, the baby armoire sat in the teacher's new bedroom. It's purpose changed quickly over many days, as teachers don't have much time for television watching.


Better Homes and Gardens Declutter your craft cupboard

Having found inspiration in this beautiful mama-sized-armoire-turned-craft-cupboard, it was decided that an updated appearance was needed.

Flower number 12: an end of year party

The end of the year amidst tweens who are totally spent after a season of testing is just silly. No one wants to work anymore. We all just want to play. A fun reward for students is a class party because if you can't beat 'em, join 'em. And parties are fun. So. Are. Muppets.

For our Muppet Party, I printed coloring sheets, played Muppet music on Spotify, showed YouTube videos about the making of Muppets, and some Jim Henson projects. And, at the end of the day, we played Muppet Karaoke with our classroom technology.

Of course, the party would not be complete without Kermit cupcakes inspired by Crystal at Simply Being Mommy. Green frosting and Mentos = Smiles.


Piggy Pops were a spontaneous invention. I used giant regular and strawberry flavored marshmallows, food coloring, and lollipop sticks. These are super fun for posing in front of the camera. 


Speaking of posing for the camera, we made a Muppet Photo Booth using a template from Disney Family and some old 3D movie glasses!


Flower number 9 :: three little bears

With a nice sheet of redwood, what's a girl to do? A little research on how to transfer images onto wood brought me to a solution using my printer and some clear, acrylic caulking. It's a rough outcome, with plastic-y edges, but when placed on a wall, and viewed from afar, my Three Little Bears are growin' on me.

If you'd like to try the ink-jet transfer, you should. It's really easy.
Here's how:

S t e p 1:
Choose an image and make the necessary edits to it in Photoshop. I posterized this photo of a redwood tree. Print it out using regular paper and an inkjet printer.
S t e p 2:
Using a clear, acrylic caulking medium, spread a thick, even layer of it over your picture. Smooth it out as much as you can. Place it face down onto your wood and wait a few days for it to dry.


S t e p 3:
Spray, or pour a little water onto the dried image. Using your index finger, gently rub the water into the paper. This will start to pull the paper away from the caulking medium, which is adhered to the wood. You will start to see that your image is left behind!


Flower number 6 :: let them eat cake and punch

This reminds me of a fun weekend with friends last September. Let Them Eat Cake and Punch. 

It's my Marie Antoinette paper cut birthday card for Nikki (left) and stylized photo of the birthday girl, herself (right).


Flower number 3 :: two trees

I love little handmade trees so I made a couple myself. The first one is made from dollhouse shingles. The second one from felt and pins. Found the inspiration over here and here. Adding little flags from scrap paper made them really cheerful, so I leave them up year round!


Flower number 1 :: The First Flower for Ferdinand

The first flower I have for Ferdinand is an oldie.

I love winter break because it means time away from, time to miss, and extra time to snuggle up with, Jasper and Koko. I read a bunch of different opinions on the interwebs about how long is too long for kitties without a human companion, but I had to settle with an auto-feeder and friend check-in combo, during my week away. They snuggled up quite a bit when I came home.

This is a small, acrylic portraiture I made of them a couple of years back.

I guess it's old-mews.